
How to self host Boltcard Lndhub and get your first NFC Bitcoin card with Docker and Umbrel
"Welcome to the Bitcoin Lightning Bolt Card, the world's first Bitcoin debit card. This revolutionary card allows you to easily and securely spend your Bitcoin at lightning compatible merchants around the world." Bolt Card
I discovered few days ago the Bolt Card and I need to say that's pretty amazing. Thinking that we can pay daily with Bitcoin Sats in the same way that we pay with our Visa/Mastecard debit cards is really something huge⚡(based on the fact that sellers are accepting Bitcoins obviously!)
To use Bolt Card you have three choices :
- Use their (Bolt Card) own Bolt Card HUB and their own BTC Lightning node
- Use your own self hosted Bolt Card Hub and an external BTC Lightning node
- Use your own self hosted Bolt Card Hub and your BTC Lightning node (where you shoud have active Lightning channels)
⚡ The first choice is the quickiest and simpliest way to have an NFC Bolt Card. It will take you few seconds (for real). You'll have to wait much longer to receive your NFC card from a website where you bought it than configure it with Bolt Card services.
⚡⚡ The second choice is pretty nice too because you won't have a VPS + to deal with all the BTC Lightnode stuff but you'll use an external one. From the Bolt Card tutorial about Bolt Card Hub, they use a Lightning from voltage.cloud and I have to say that their services are impressive. In few seconds you'll have your own Lightning node and you'll be able to configure it into the Bolt Card Hub settings.
PS : voltage.cloud offers 7 trial days / 20$ so don't hesitate to try it!
⚡⚡⚡ The third one is obvisouly a bit (way) more complex because you'll have to provide a VPS + Bitcoin node and a Bitcoin Lightning Node to be able to send and receive Lightning payments with your Bolt NFC Card. So you shoud already have configured everything by yourself to follow this tutorial. I will show what I did for my own installation and all my nodes (BTC & Lightning) are provided by my home Umbrel node (as I don't want to publish my nodes directly on the clearnet). We'll see how to connect to the Umbrel Lighting node later (spoiler: Tailscale).
To resume in this tutorial, I have :
- 1 Umbrel node (rpi4b) with BTC and Lightning with Tailscale installed.
- 1 VPS (Virtual Personal Server) to publish publicly the Bolt Card LNDHub and Bolt Card containers configured the same way as my other containers (with Nginx Proxy Manager)
Ready? Let's do it ! ⚡
Configuring Bolt Card & Bolt Card LNDHub
Always good to begin by reading the bolt card-lndhub-docker github repo. To a better understading of all the components, you can check this schema :

We'll not use it as it is because we'll skip the Caddy part because we already use Nginx Proxy Manager.
To begin we'll clone all the requested folders :
git clone https://github.com/boltcard/boltcard-lndhub-docker bolthub
cd bolthub
git clone https://github.com/boltcard/boltcard-lndhub BoltCardHub
git clone https://github.com/boltcard/boltcard.git
git clone https://github.com/boltcard/boltcard-groundcontrol.git GroundControl
PS : we won't see how to configure GroundControl yet. This article may be updated later.
We now need to modify the settings file with our own settings :
mv .env.example .env
nano .env
You need to replace "your-lnd-node-rpc-address" by your Umbrel TAILSCALE ip address (you can find your Umbrel node IP from your Tailscale admin console):
LND_IP=your-lnd-node-rpc-address # <- UMBREL TAILSCALE IP ADDRESS
LND_GRPC_PORT=10009
LND_CERT_FILE=tls.cert
LND_ADMIN_MACAROON_FILE=admin.macaroon
REDIS_PASSWORD=random-string
LND_PASSWORD=your-lnd-node-unlock-password

#docker-compose.yml only
GROUNDCONTROL=ground-control-url


# docker-compose-groundcontrol.yml only
FCM_SERVER_KEY=hex-encoded
APNS_P8=hex-encoded
APNS_P8_KID=issuer-key-which-is-key-ID-of-your-p8-file
APPLE_TEAM_ID=team-id-of-your-developer-account
BITCOIN_RPC=bitcoin-rpc-url
APNS_TOPIC=app-package-name
We now need to generate an AES key and insert it into the "settings.sql" file :
hexdump -vn 16 -e '4/4 "%08x" 1 "\n"' /dev/random
19efdc45acec06ad8ebf4d6fe50412d0

nano settings.sql- Insert the AES between ' ' right from 'AES_DECRYPT_KEY'
- Insert your domain or subdomain (subdomain in my case) host between ' ' from 'HOST_DOMAIN'
- Insert your Umbrel tailscale IP between ' ' from 'LN_HOST'
Be aware that this subdomain won't be the LNDHub container (boltcard_hub:9002) but the Boltcard container (boltcard_main:9000)
\c card_db;

DELETE FROM settings;

-- at a minimum, the settings marked 'set this' must be set for your system
-- an explanation for each of the bolt card server settings can be found here
-- https://github.com/boltcard/boltcard/blob/main/docs/SETTINGS.md

INSERT INTO settings (name, value) VALUES ('LOG_LEVEL', 'DEBUG');
INSERT INTO settings (name, value) VALUES ('AES_DECRYPT_KEY', '19efdc45acec06ad8ebf4d6fe50412d0'); -- set this
INSERT INTO settings (name, value) VALUES ('HOST_DOMAIN', 'sub.domain.tld'); -- set this
INSERT INTO settings (name, value) VALUES ('MIN_WITHDRAW_SATS', '1');
INSERT INTO settings (name, value) VALUES ('MAX_WITHDRAW_SATS', '1000000');
INSERT INTO settings (name, value) VALUES ('LN_HOST', ''); -- set this
INSERT INTO settings (name, value) VALUES ('LN_PORT', '10009');
INSERT INTO settings (name, value) VALUES ('LN_TLS_FILE', '/boltcard/tls.cert');
INSERT INTO settings (name, value) VALUES ('LN_MACAROON_FILE', '/boltcard/admin.macaroon');
INSERT INTO settings (name, value) VALUES ('FEE_LIMIT_SAT', '10');
INSERT INTO settings (name, value) VALUES ('FEE_LIMIT_PERCENT', '0.5');
INSERT INTO settings (name, value) VALUES ('LN_TESTNODE', '');
INSERT INTO settings (name, value) VALUES ('FUNCTION_LNURLW', 'ENABLE');
INSERT INTO settings (name, value) VALUES ('FUNCTION_LNURLP', 'ENABLE');
INSERT INTO settings (name, value) VALUES ('FUNCTION_EMAIL', 'DISABLE');
INSERT INTO settings (name, value) VALUES ('AWS_SES_ID', '');
INSERT INTO settings (name, value) VALUES ('AWS_SES_SECRET', '');
INSERT INTO settings (name, value) VALUES ('AWS_SES_EMAIL_FROM', '');
INSERT INTO settings (name, value) VALUES ('EMAIL_MAX_TXS', '');
INSERT INTO settings (name, value) VALUES ('FUNCTION_LNDHUB', 'ENABLE');
INSERT INTO settings (name, value) VALUES ('LNDHUB_URL', 'http://boltcard_hub:9002');
INSERT INTO settings (name, value) VALUES ('FUNCTION_INTERNAL_API', 'ENABLE');
You now need to get two files used by Bolt Card LND Hub, the admin.macaroon and tls.cert files from your Umbrel BTC Ligtning node. You can get these files on your Umbrel node at these locations :
/home/umbrel/umbrel/app-data/lightning/data/lnd/tls.cert
/home/umbrel/umbrel/app-data/lightning/data/lnd/data/chain/bitcoin/mainnet/admin.macaroon
You can use either WinSCP, scp or ssh to copy these files to your local workstation and copy them again to your VPS to the root folder "bolthub".
You shoud have all these files into the bolthub directory :
johndoe@yourvps:~/bolthub$ ls -al
total 68
drwxrwxr-x  6 johndoe johndoe 4096 Jul 30 00:06 .
drwxrwxr-x  3 johndoe johndoe 4096 Jul 22 00:52 ..
-rw-rw-r--  1 johndoe johndoe  482 Jul 29 23:48 .env
drwxrwxr-x  8 johndoe johndoe 4096 Jul 22 00:52 .git
-rw-rw-r--  1 johndoe johndoe   66 Jul 22 00:52 .gitignore
drwxrwxr-x 11 johndoe johndoe 4096 Jul 22 00:52 BoltCardHub
-rw-rw-r--  1 johndoe johndoe  113 Jul 22 00:52 Caddyfile
-rw-rw-r--  1 johndoe johndoe  173 Jul 22 00:52 CaddyfileGroundControl
drwxrwxr-x  6 johndoe johndoe 4096 Jul 22 00:52 GroundControl
-rw-rw-r--  1 johndoe johndoe  431 Jul 22 00:52 GroundControlDockerfile
-rw-rw-r--  1 johndoe johndoe 1913 Jul 22 00:52 README.md
-rw-rw-r--  1 johndoe johndoe  293 May  6 22:24 admin.macaroon
drwxrwxr-x 16 johndoe johndoe 4096 Jul 22 00:52 boltcard
-rw-rw-r--  1 johndoe johndoe 3866 Jul 22 00:52 docker-compose-groundcontrol.yml
-rw-rw-r--  1 johndoe johndoe 2985 Jul 22 00:57 docker-compose.yml
-rw-rw-r--  1 johndoe johndoe 1909 Jul 29 23:56 settings.sql
-rw-rw-r--  1 johndoe johndoe  802 May  6 22:21 tls.cert
We need to do few last tasks to ensure that Bolt Card LNDHub will work perfectly.
It's maybe already the case on your VPS but your user should be member of the docker group. If not, you can add your user by doing :
sudo groupadd docker
sudo usermod -aG docker ${USER}
If you did these commands, you need to logout and login again.
We also need to create all the docker named volumes by doing :
docker volume create boltcard_hub_lnd
docker volume create boltcard_redis
Configuring Nginx Proxy Manager to proxify Bolt Card LNDHub & Boltcard
You need to have followed my previous blog post to fit with the instructions above.
As we use have the Bolt Card LNDHub docker stack in another directory than we other services and it has its own docker-compose.yml file, we'll have to configure the docker network into the NPM (Nginx Proxy Manager) docker-compose.yml to allow NPM to communicate with the Bolt Card LNDHub & Boltcard containers.
To do this we need to add these lines into our NPM external docker-compose (not the same one that is located into the bolthub directory, the one used for all your other containers) :
nano docker-compose.ymlnetworks:
bolthub_boltnet:
name: bolthub_boltnet
external: trueBe careful, "bolthub" from "bolthub_boltnet" is based on the directory where Bolt Card LNDHub Docker docker-compose.yml file is located.
We also need to attach this network to the NPM container :
  nginxproxymanager:
    container_name: nginxproxymanager
    image: 'jc21/nginx-proxy-manager:latest'
    restart: unless-stopped
    ports:
      - '80:80' # Public HTTP Port
      - '443:443' # Public HTTPS Port
      - '81:81' # Admin Web Port
    volumes:
      - ./nginxproxymanager/data:/data
      - ./nginxproxymanager/letsencrypt:/etc/letsencrypt
    networks:
      - fractalized
      - bolthub_boltnet
You can now recreate the NPM container to attach the network:
docker compose up -dNow, you'll have to create 2 new Proxy Hosts into NPM admin UI.
First one for your domain / subdomain to the Bolt Card LNDHub GUI (boltcard_hub:9002) :
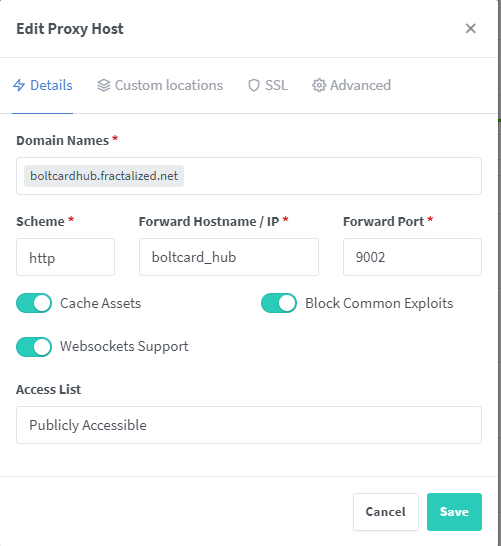
And the second one for the Boltcard container (boltcard_main:9000).
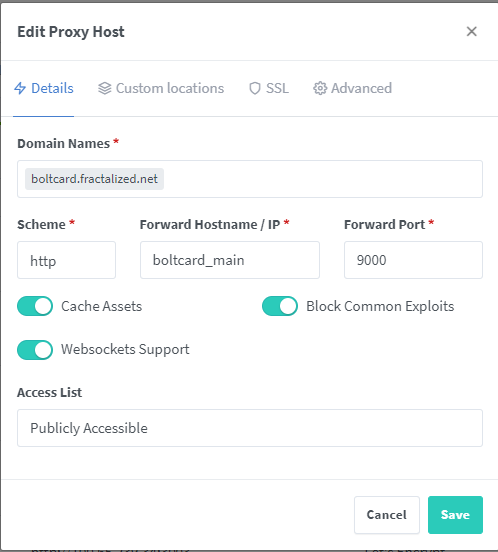
In both Proxy Host I set all the SSL options and I use my wildcard certificate but you can generate one certificate for each Proxy Host with Force SSL, HSTS enabled, HTTP/2 Suppot and HSTS Subdomains enabled.
Starting Bolt Card LNDHub & BoltCard containers
Well done! Everything is setup, we can now start the Bolt Card LNDHub & Boltcard containers !
You need to go again to the root folder of the Bolt Card LNDHub projet "bolthub" and start the docker compose stack. We'll begin wihtout a "-d" to see if we have some issues during the containers creation :
docker compose upI won't share my containers logs to avoid any senstive information disclosure about my Bolt Card LNDHub node, but you can see them from the Bolt Card LNDHub Youtube video (link with exact timestamp where it's shown) :
If you have some issues about files mounting of admin.macaroon or tls.cert because you started the docker compose stack the first time without the files located in the bolthub folder do :
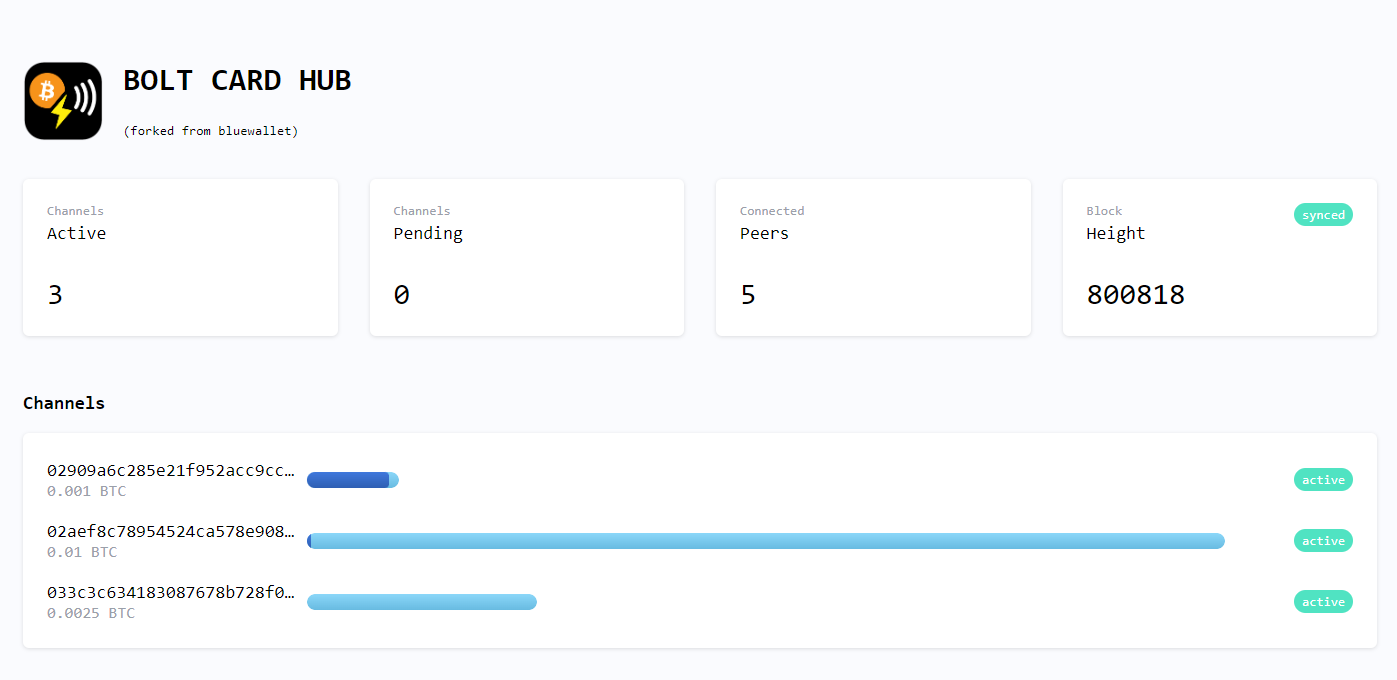
docker compose down && docker compose up After waiting few seconds/minutes you should go to your Bolt Card LNDHub Web UI domain/sudomain (created earlier into NPM) and you should see the Bolt Card LNDHub Web UI :
if everything is OK, you now run the containers in detached mode :
docker compose up -dVoilààààà ⚡
If you need to all the Bolt Card LNDHub logs you can use :
docker compose logs -f --tail 30You can now follow the video from Bolt Card to configure your Bolt Card NFC card and using your own Bolt Card LNDHub :
PS : there is currently a bug when you'll click on "Connect Bolt Card" from the Bold Card Walle app, you might have this error message "API error: updateboltcard: enable_pin is not a valid boolean (code 6)". It's a know issue and the Bolt Card team is currently working on it. You can find more information on their Telegram
Thanks to the Bolt Card, the issue has been corrected : changelog
See you soon in another Fractalized story!